Painting Furniture Tips

DIY Valentine's Day Decor!

Valentine's Day!! One of my favorite holidays! One of the things I love most about Valentine's Day Is  getting our front door ready for Valentine's Day! Who doesn't love a cute and welcoming holiday themed front door?

I followed a very simply DIY burlap wreath tutorial I had found on Pinterest and made this wreath. The X and the O I purchased at Walmart and painted the letters light pink and added some white twine for a little more eye catching appeal. I then placed the wreath in front of an old window I had found at a local flea market. The window was narrow and had the glass broken out of it, which made it perfect for hanging on the front door!

I also painted a couple of paint cans which you can pick of at your local Lowe's. Super cheap. I think they are around $2. I used a little black paint on the front and stenciled "Water" on one paint can and "Me" on the other paint can and stuck some Ivy in them! :) But, I'm thinking this year I'm going to try herbs in them! :)

At some point I DO need a Valentine's Day door mat!!! The cotton in the picture is from a local cotton farm here in NE Arkansas. :)


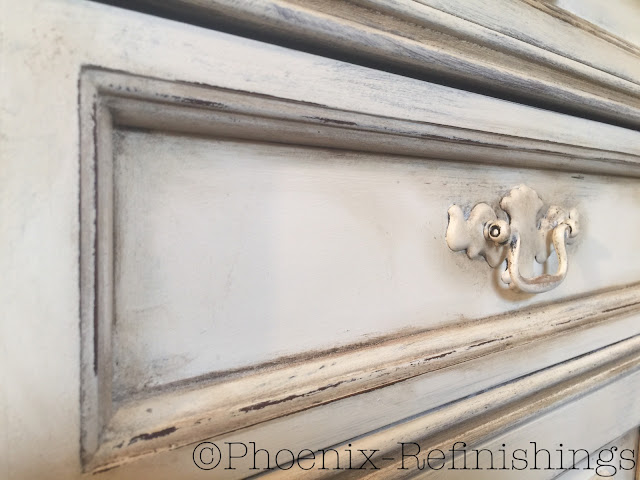
Painting Furniture The Perfect Cream Color

I get asked A LOT to paint furniture in "a cream color".  It is close to my most requested finish that I paint for clients. And it is SUCH a classic. Timeless. Will never go out of style much like CoCo Channel and the little black dress. 

The pictures below I used Annie Sloan Old Ochre for the perfect cream color. It always meets my clients expectations of Cream. It is important to note that Annie Sloan has a color that is named "Cream". But, If you are from England cream to you is butter. So Annie's "Cream" color is a pale yellow. :) Make sure you pick up Old Ochre if you are in the U.S. and looking for an off white/cream color for your furniture. :) 


DIY Epoxy Countertops

UPDATE: For More Details On Epoxy Countertops please CLICK HERE This is the full tutorial on my Website letspaintfurniture.com :)

WOW! When I first started our kitchen Reno I thought putting in concrete or granite or quartz countertops would be no big deal! Like, how expensive could it REALLY be? The first estimate for concrete countertops was a little over $4,000. Granite was a little closer to $6,000 and I soon realized we could not afford either!!! So I quickly had to come up with a plan B. Okay, this was like plan Q bc epoxy countertops was never a thought in my head. 

It took me close to 2 months of scouring the Internet and Pinterest before I found something that looked affordable and durable and beautiful. I came across Raising A Farmhouse Blog . She updated her Granite countertops with Stone Coat Countertops Epoxy. Her countertops are GORGEOUS and stunning! And she put epoxy over Granite! Surely, I could do this over laminate!? 

After hours of watching youtube video's (which I still watch! ;) I finally got the courage to order the epoxy! I purchased their sample size to play around with it. Their sample size is $50. Perfect to test it out! I made a sample board WITHOUT measuring my Hardener and Resin proportionality and I failed! lol. I had sticky epoxy that was never going to dry bc I did not measure appropriately! 

I learned my lesson and SUPER thankful I didn't just try this on our kitchen counters without practicing first! Try number 2, I mixed according to the directions!! ;) And it worked!!! I had epoxy that hardened over night! For the design I used black rustoleum spray paint with some gold and silver! :) My husband was terrified I would burn the house down with a torch. So, I had to use a heat gun to pop all of the bubbles in the epoxy. But, even that worked GREAT! It's been a little over a year and our countertops have held up wonderfully!!! Did I mention we have 5 kids!?!!?


Sanded, primed and ready for epoxy!

Countertops after Epoxy and design

Dried Epoxy Countertops!!

Picture after Clear coat of Epoxy 


DIY Farmhouse Kitchen

 I can't believe it has been a year!! One year since I painted our kitchen cabinets, put up a new backsplash and resurfaced the kitchen countertops! (I put epoxy over our existing laminate counters) I painted our cabinets in kind of an olive Gray color(Chateau Grey from Annie Sloan). I originally wanted white!! But, we have 5 kiddos. And, I mean, come on...I KNOW something is going to happen to white cabinets with 5 kids. :) I ordered the hardware for the cabinets off of Amazon and the silverware sugar mold I found at a flea market in Missouri for $7!?! 

Stay tuned for a close up of our DIY Kitchen countertop faux marble finish!! 


How to Add Black Wax To A Mirror

The trick!!! Are you guys ready!? When applying your black wax always make sure you have applied clear wax first and that you have wiped away the excess with a shop towel. Once mirror feels nice and smooth dab in/pack in your black wax everywhere! Put a big coat of black wax on the parts you want to really add detail too. Then wipe away the black wax WITH additional clear wax until all the black is nicely in the nooks and crannies of your piece! :) That is how I achieved this look for the pic below! :)


How to Brighten Natural Wood!

Oh this little table! I (of course) fell in love with this guy when I saw him at a local flea market! (So our town has like 10-15 AWESOME flea markets) I snagged this table for $17! The top was painted in a black latex paint and my original idea was to bring it back to its natural beautiful wood! As I began peeling the layer of latex paint off I noticed GIANT water damage. At this time I opted to continue to get the latex black paint off and put on a NEW fresh coat of Annie Sloan's Graphite Chalk paint! :) Thankfully it worked like a charm! I was able to brighten the legs and shelf up with HEMP oil by Miss Mustard seed. It's soaks in beautifuly to the natural wood for a shiny and bright finish! 


Kids Bedroom Makeover!

I had SO much fun designing our kiddo's bedroom! This particular bedroom belongs to our 6 year old Son and our 4 year old daughter. I wanted to pick colors that were not gender specific and yet if we wanted this to be a guest bedroom it could easily turn back into one! :) I used a Royal Design Studio stencil for the accent wall. Stencil's are an affordable way to add some fun to a room! MUCH cheaper than wallpaper. ;) The kiddos beds I ordered from Walmart They are designed by the Novogratz Family. Fun thing about them they have more kiddo's than we do!! 


Painted Chalk Paint Kitchen Cabinets


Kitchen Cabinets!! How to paint them? Where to start!? Well, for this kitchen I did for a client with her help! I always like to recruit my customers to help me! That way they get to learn something and together we can work and get the job done faster! ;)


We began by lightly cleaning the cabinets with TSP and rinsing with water. Once cabinets had been prepped we painted 2-3 coats of Annie Sloan's Old White Chalk paint. Once cabinets were covered well to our liking we sealed them with clear wax! :) That's the tough part, Make sure to always use a paper wax brush! I prefer the WAXINE brand for the best finish on furniture and cabinets!


Chair Love!!!


Chairs...chairs...chairs!! Have you ever walked into a flea maket and fallen for the $10 chair? It's SUCH a good bargain you just can't pass it up!? That is what I did with this guy! I think he was actually $12. I used some scrap fabric to recover the seat and I painted the color Arles Chalk paint by Annie Sloan in random spots and then covered complete in Graphite chalk paint. Lightly wet distressed to bring out the hints of yellow. :) Also HEMP oil! I used hemp oil on that beautiful wood to make it bright and pretty. :) Comment below if you like this guy!


These end tables were painted in Dixie Belle Caviar. What a beautiful true rich black!! I had a client who was wanting a dark black one with no blueish hue and Dixie Belle's Caviar was the perfect match!! A light gray wash over the details finished this set off! 


Epoxy Countertop Sample Board

 Ahh! These were SO much fun to make!! This was probably the 3rd sample board I made trying to get a faux marble look with epoxy! I used Stone Coat Epoxy for this project. Their epoxy truely is the best on the market. It is tried and true! It gives almost a mirror/high gloss finish! It's important to note that when working with epoxy all paints need to be oil based or it will yellow! 

Seriously anyone can do this! I recommend watching ALL of Stone Coat countertops your tube video's! They give full video tutorials! :)


Epoxy Countertops!


Epoxy countertops!! I FELL in love with Raising a Farmhouse Faux Marble Countertops ! They are SO beautiful! And she did the epoxy over granite!!? Yes! And they turned out beautiful. :) I' m sharing below a home renovation I was asked to do epoxy countertops over existing laminate from the 70's! It's a great way to update countertops that is affordable AND beautiful! ;) 


Before and After Painted Furniture

Sharing little Before and After of a recent custom order I painted!! This piece was painted in Annie Sloan's Old Ochre and highlighted with dark wax! What do you guys think? The top I used General Finishes Java Gel and Satin Poly to seal! :)


How To Stencil Furniture

Who doesn't love stenciling!?!? Stenciling is probably one of my favorite things to do to a piece of furniture! Stenciling can add ...

Most Popular Posts